
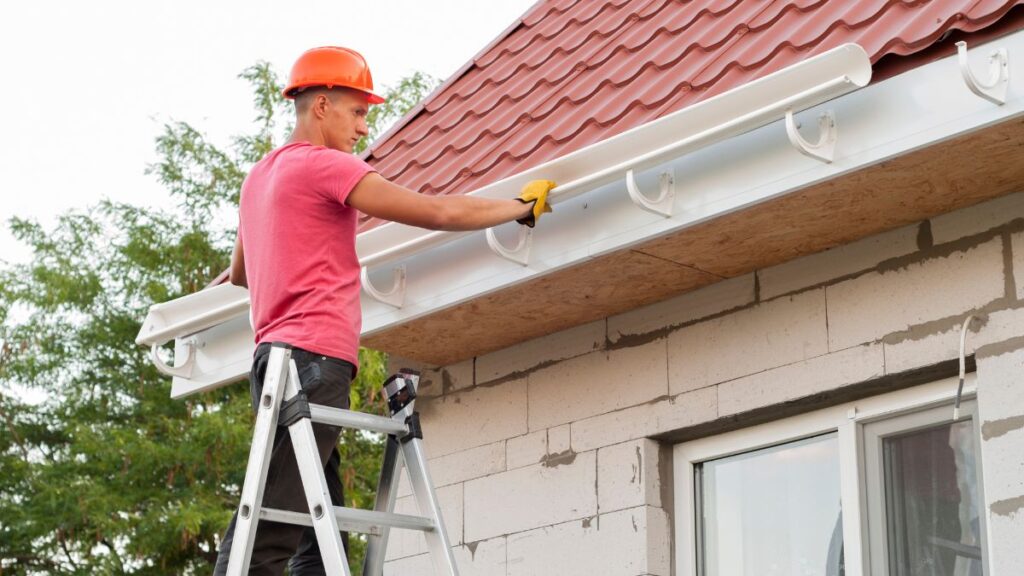
A sagging gutter on a rainy day feels just like an umbrella folding in on itself—annoying, inconvenient, and confidence-shaking. Tackling gutter hanger repair can rescue curb appeal and prevent expensive water problems down the line. Most homeowners realize a single drooping section can quickly pull the whole line crooked, calling for effective solutions.

Simple Lubrication Tips for Sliding Doors
Keep doors gliding smoothly! Follow these simple lubrication tips to fix sticking sliding doors fast. Read on and learn more!
Well-maintained gutters play a huge role in protecting your home’s foundation, siding, and landscaping. Without timely gutter hanger repair, water can overflow, rotting fascia boards and even causing tricky leaks inside. Delaying repairs means steeper costs and takes more work later, leaving you wishing you acted sooner.
This guide dives deep into practical steps for diagnosing gutter sag and caring for your hardware. Explore the article to understand the tools, warning signs, and step-by-step fixes that turn wobbly gutters into crisp, reliable channels for stormwater—even in the roughest weather.
Identifying Sagging Gutter Issues Keeps Damage Minimal
Knowing precisely what sagging looks like helps you spot trouble early. A sagging gutter droops unevenly along your home’s roofline. Water may pool or spill over at certain spots, especially during strong downpours.
By acting before visible water damage occurs, homeowners save time and prevent big headaches. Catching sagging at first sight is the foundation of effective gutter hanger repair.
Visual Inspection Techniques Reveal Key Problems
Many folks walk the base of their home, studying gutters from several angles for bending or low points. Look closely right after rain—sagging will show up as lingering water in the trough.
Use a sturdy ladder and check each gutter hanger with your hand. If the metal feels loose or if you spot missing hangers entirely, note these zones for your repair project.
Rusted screws, separated seams, or gutters pulling away from fascia boards are clear signals. Mark these locations, since thorough gutter hanger repair requires targeting every failed spot for real results.
Listening for Warning Cues and Assessing Water Flow
On rainy days, listen for dripping sounds from behind gutters. That noise often signals improper slope or failing supports that push water where it shouldn’t go, risking foundation and window leaks.
Check for stripes or stains on your siding, since these often indicate overflowing water not contained by sagging gutters. Residents occasionally notice muddy splashes or eroded mulch too—another strong cue.
If pools form near your foundation, water is escaping. Don’t let these little signs grow into costly rot. Observing gutter performance year-round helps you spot when gutter hanger repair is urgently needed.
| Symptom | Likely Cause | Impact | Action Step |
|---|---|---|---|
| Gutter sags in the middle | Loose or missing hangers | Water overflow, fascia damage | Reinstall or tighten gutter hangers |
| Dripping behind gutter | Improper pitch | Foundation risk, wood decay | Adjust hanger placement |
| Visible gaps at ends | Pulled fasteners | Edge leaks | Secure or replace end hangers |
| Rusted screws | Aging hardware | Weakens structure | Replace with stainless screws |
| Overflow during storms | Sagged channel | Water damage below | Realign gutter and add hangers |
Choosing the Right Gutter Hanger Type for Reliable Results
Matching your gutter and roof style with the proper hanger offers lasting, sag-free results. The correct hardware supports weight and resists twisting during storms. Selecting wisely saves both hassle and money in the long run.
Gutter hanger repair works best when you use new, robust fasteners and compatible brackets. Avoid mixing parts or using old warping materials that could worsen sag and shorten the life of your gutter system.
Direct-to-Fascia and Hidden Hanger Options Explained
Direct-to-fascia hangers attach straight into wood, offering strong and simple support. Homeowners choosing this style are typically looking for affordability and easy installation with basic tools in hand.
Hidden hangers install inside the gutter channel and aren’t visible from below. They give a cleaner look and better resist pulling in heavy rain or snow—an excellent upgrade if you value appearance.
Check manufacturer recommendations for your gutter’s width and material. Gutter hanger repair is most reliable with hangers built for your exact shape, especially if you have heavier steel or aluminum gutters.
- Install hidden hangers for a sleek, unobtrusive finish—great for modern or renovated homes needing discreet repairs.
- Choose direct-to-fascia hangers when tackling older wooden fascia, ensuring a solid grip with wood screws for longevity.
- Select wraparound brackets for deeper gutters holding more runoff, preventing unintended flex or sag after repairs.
- Use screw-in style hangers over spike-and-ferrule for increased holding power and less seasonal movement.
- Opt for stainless or coated hardware in coastal areas, stopping rust and extending the service life of your gutter hanger repair.
Always align hanger spacing according to manufacturer specs—closer together for heavy rooflines or areas with frequent debris loading.
Comparing Price Points With Performance for Repair
Some homeowners aim for the lowest up-front cost, but bargain hangers can bend prematurely. Always balance price with reviews and strength ratings when restocking supplies for gutter hanger repair.
Mid-tier hidden hangers suit most homes and keep visible sag at bay. Only select premium, reinforced models for unusually long gutter runs or high-wind locations.
Recalling a client who regretted saving $8 by choosing lightweight brackets, I recommend setting a budget that weighs durability over minimal savings. Plan repair costs before purchasing materials.
- Order enough hangers for a 2-foot spacing rule—never reuse aged or bent old hardware when performing a thorough repair.
- Keep extra screws and brackets handy for unexpected discoveries while on the ladder.
- Test each style with a gentle downward pull after installation—keep those that resist flex for long-term results.
- Record the brand and type of hanger for next season’s check-ups or future repairs.
- Doublecheck compatibility with gutter thickness—avoid loose fits that can slip free after storms.
Smart planning before you buy means your gutter hanger repair restores both function and peace of mind.
Stepwise Installation Secures Every Section on the First Try
Start every repair by planning a logical work zone, keeping tools and new hangers within arm’s reach on a safe ladder platform. Prioritize safety and double-check every fastener as you move along the gutter length.
Following a consistent step sequence makes your gutter hanger repair efficient and reduces the risk of misaligned runs or those frustrating, persistent sags.
Sequence for Preparing Gutter and Fascia Area
Clear the gutter of debris with a stable scoop, wearing gloves to avoid sharp edges. Clearing helps ensure hangers seat firmly against the channel and wood below, leading to a sturdy, permanent fix.
Dry both the gutter and fascia with a towel for better adhesion and safer handling. Wet wood and slippery metal increase the risk of stripped or loose screws, undermining your gutter hanger repair.
Inspect wood underneath for rot by gently prodding with a screwdriver. Repair or replace any soft spots before continuing to maximize hardware lifespan and avoid future sag.
Aligning and Fastening the Hangers With Precision
Mark a chalk line along the fascia just low enough for a slight gutter tilt toward the downspout. This pitch ensures water drains swiftly, supporting the intent of your repair.
Place new hangers at intervals matching manufacturer’s guidelines—no more than two feet apart for standard aluminum. Use a measuring tape so each bracket bears equal load, preventing sag return.
Tighten screws until snug but never overtightened, which can warp metal. Confirm each section sits flush to the wood by pressing down lightly, completing your gutter hanger repair with methodical attention.
Maintaining Your Fix for Lasting Support Over Time
An effective gutter hanger repair doesn’t end with installation. Maintenance—like checking for loose fasteners and keeping gutters cleared—preserves each season’s results. Regular inspection helps gutters shed water away from the house, keeping your curb appeal crisp.
Preventative care makes future repairs easier. Homeowners who maintain hardware each year save themselves ladder time and costly surprises by heading off damage before it forms.
Routine Inspection Schedules Give Early Warning
Spring and fall are ideal for walking the gutter line and gently tugging on a few hangers. Watch for anything that feels loose, and tighten as needed. Record your findings for next season’s checkup.
During these checkups, pay special attention to corners and end-caps—the zones most likely to pull away from the wood or show overflow leaks if neglected after gutter hanger repair.
If climbing isn’t your thing, train your eye from the ground for mismatched angles or daylight shining where hangers once sat flush.
Seasonal Gutter Clearing to Ease Strain
Clear leaves and twigs as soon as you see them gathering in your gutters. This reduces weight, preventing even the strongest hangers from buckling or pulling loose during storms or wind-driven rain sessions.
If nearby trees shed heavily, trim branches that threaten your roofline to lessen clutter. A gutter that stays free-flowing all year rarely needs frequent gutter hanger repair beyond normal maintenance cycles.
When cleaning, check gutter seams and joints for separation or leaks. Reseal if necessary to prevent water escape that strains even freshly repaired supports.
Reducing Gutter Sag Risks With Small Everyday Habits
Simple actions around the house go a long way in reducing the frequency of gutter hanger repair jobs. Adopt these habits for lasting gutter health and fewer surprises as seasons change.
Routinely scanning trouble spots becomes second nature, saving you from frantic roof work just ahead of big storms. Proactive maintenance is faster and more convenient than repairing after serious sag develops.
Adopting Smart Gutter and Landscape Practices
Keep ground below gutters gently sloped away from the house, reducing the risk of pooled water reflecting issues above. Healthy landscaping can reveal drainage changes after heavy weather, signaling when a quick gutter hanger repair checkup is wise.
Swap splash blocks or extensions at the base of downspouts, guiding runoff even farther from your foundation. A friend noticed new mulch washed away after a downpour—an easy hint her gutters needed reinforcement.
After every project or outdoor chore, give your gutter line a quick visual scan. Many sagging problems catch the eye only when you know to look carefully and often.
Managing Exterior Upkeep With Neighbors and Family
Coordinate gutter checks with family spring cleaning or ask a neighbor to remind you quarterly. Some neighborhoods establish schedule reminders or swap help, so nobody’s left with sagging gutters for long.
A neighbor’s checklist included: “Each season, circle the house, photograph each gutter. Compare pictures year-to-year.” Following a similar habit helps catch changes needing gutter hanger repair before they escalate into costly repairs.
Protect yourself from routine forgetfulness with calendar alarms and gentle neighborhood nudges—simple prompts keep every gutter firmly in line year-round.
Putting It All Together for Professional-Level Results
Approaching gutter hanger repair as a system—inspection, selection, installation, and maintenance—gives you an edge. Each step supports the next, working together for a straight, dependable channel outside every room.
Trustworthy repairs start with small habits. Even on busy days, look for bent metal or downspout puddles after storms. Quick actions stack up, turning a 10-minute check into a whole season of trouble-free performance.
Stable, leak-free gutters protect landscaping, foundations, and paint alike—evidence you’re winning the fight against water damage. When gutter hanger repair becomes routine, expensive calls to the pros fade into memory.
Frequently Asked Questions
Walk the entire run after installation, gently pressing down every few feet. If the gutter sits tight against the fascia and water drains without pooling, your fix succeeded. Stay alert for shifting or sag after the next storm as a sanity check.
Replace every hanger you see as loose, rusted, or misaligned. Many homeowners do a full refresh if the hardware is aged, since a consistent set holds the line straighter and extends the repair’s impact for years.
You need a sturdy ladder, screw gun, appropriate hangers, screws, a chalk line, gloves, and safety glasses. A gutter scoop, wood sealant, and rust-resistant screws can make your job easier and boost repair reliability.
Confident DIYers who follow ladder safety and have proper tools can handle most repairs themselves. Hire a pro for multi-story homes, rotten fascia, or when you’re not comfortable working at heights. Safety always comes first.
Temperature swings can make metal contract and expand, occasionally loosening screws. Inspect gutters after the first storm and lightly tighten any hardware that feels loose. Seasonal checkups prevent small shifts from turning into new sag over time.
Unclogging Slow Drains
Unclog slow drains naturally! Use simple household methods to clear buildup without harsh chemicals or plumber costs.

